Saturday, 30 June 2018
3D Studio Max Use of Plugin Shag Hair
3D Studio Max Use of Plugin Shag Hair
So read and lean�����.
Understanding Hair Concepts
Before getting into the tutorial, you need to understand some basic concepts about the Hair system along with some terminology.
The individual hairs in Shag: Hair system are called strands. There are two types of strands: Vertex Strands and Middle Strands. Vertex strands are the objects that appear in the view-port when you assigned an object as an emitter for the hair system.

The next level of hair in the system is the middle strand. These are the strands that are actually rendered. They do not appear in the view-port and are not located on the vertices of the object. But, they are based on the nearest vertex strands. So, any changes to the vertex strands are immediately transmitted to the middle strands at render time. As with vertex strands, some of the hair and fur commands will only affect the middle strands.
When using Shag Hair, you must use a model hair as the shape for your hair. A model hair is simply defined as a spline or NURBS curve that has had the Model Hair modifier applied to it. Once the modifier is applied, it can be used as the hair instead of straight lines. This gives you a true sense of flexibility in how you can create your hair. The hair routines, as a matter of fact, require the use of at least one model hair before any hair will be rendered.
Since model hairs are based on splines, you are probably already familiar with terms like vertices and segments. Hair uses the term knot. A knot is similar to the vertex of a spline that is using a Bezier Spline corner type. The more knots you have in a model hair, the more accurate the motion of that hair will be, but also the longer it will take to calculate dynamics on the hair strands. Hair also uses the term bezier steps, which is simply the number of straight- line segments between knots. The more steps you have the smoother the hair will appear, but the longer it will take to render and calculate dynamics. Now that you have a grasp of some of the basic terminology associated with the Shag: Hair system, you are ready to dive into the tutorials.
Shag Hair Tutorial / Part 1 ( Simple Hair )
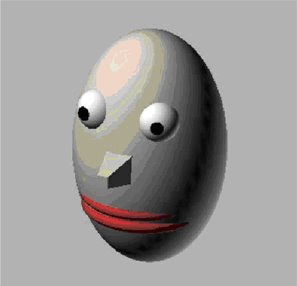
1. Load the file HAIRDEMO.MAX from your SCENES folder. This scene contains a simple cartoon style head that you will apply hair to. If you don�t have the scene then you can easily create it yourself.
First, let�s start by creating a light. Shag Hair uses special lights that are necessary to render the hair. Switch to a Top View and zoom out so you can see more of the scene.
2. In the Create Command panel, click on the lights button. Then choose Hair-Enabled Lights from the drop down list. Select an Omni light.
3. In the Top viewport, click down and to the right from the head to create the light, approximately where shown in the following figure.

5. Once the light is created, go to the Modify command panel and set the following:
Color 237,237,237
Cast Shadows On
Shadow Size 512 (this should be the default)
6. Now, it�s time to create the hair for use on the head. In the Create command panel, go to Shapes and select the Line command.
7. In the top viewport, create a line that is approximately 20 units long. Create the line with only two vertices, a start and an end one.
8. With the spline we�re going to use as a model hair still selected, go to the Modify command panel. Select the More&ldots; button, then click on the Model Hair modifier and choose OK. This assigns the Model Hair modifier to the spline.
9. From the new Model Hair modifier, expand the Coordinate Systems rollout. Enable the (Curve Base, Tangent) system. This places the Hair coordinate system at the base of the hair strand and will correctly orient the hair on the surface of the head.
NOTE: Normally, you will create many spline control strands that you will place along the scalp of your character to define how the hair will interpolate across the head. With many, you can create parts in the hair and other styling definitions. Once you�ve finished this tutorial, you are welcome to go back and create more strands for placement on the head.
Now, it�s time to setup the head for working with the hair strand. By default, if we applied Shag: Hair atmospheric now, it would cover the entire head model. However, the location of the hair strands can be controlled by changing the Material ID of the faces on the mesh, so we�re going to pick the faces where we want the hair to grow now.
10. Switch to the Right Viewport. Select the head and go to the Modify Command Panel. Enable Face Sub-Object mode.
11. Using a Window selection, select approximately the faces shown in the following figure. This selection will approximate the hairline for our model.
 12. Scroll down in the Editable Mesh command panel to the Edit Surface rollout. Change the Material ID spinner to 4. Turn off Sub-Object mode.
Now, we are almost ready to add the hair to the head, but one more task remains.
13. Hair requires either a Camera view or a Perspective view to render correctly, so lets create a camera in the scene that produces a view similar to the following figure.
 14. Now, let�s setup the actual hair system. From the main MAX pulldown menus, select Rendering / Environment. This launches the Environment dialog box.
15. Under the Atmospherics rollout, click on the Add&ldots; button. In the list that appears, select Shag: Hair and choose OK.
16. Repeat step 15, but this time add a Shag:Render entry. Both shaders must be present for Shag: Hair to render properly.
NOTE: You can have multiple Shag: Fur and Shag: Hair atmospheric
entries in the dialog, but you only need one Shag: Render entry for the system to work correctly.
17. Click on the Shag: Hair entry. You will immediately see the Hair rollout appear. In the Objects, Copy/Paste, Load/Save rollout, click on the
Pick button under Emitters. Then click on the head itself. You will see the name of the head (Sphere01) appear in the dropdown list.
18. Click on the Face Level button. This launches the Face Level Assignment dialog box where you can assign which faces the hair strands will emit from. In this dialog box, enable By Sub-Material and set the spinner to 4 to match the ID you assigned earlier. Choose OK to close the dialog box.
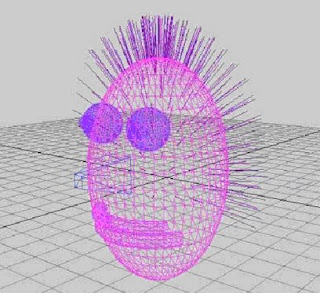
19. Under Model Hairs, choose the Pick button and select the Spline that you created earlier. After selecting the spline, you will immediately see the Shag View object appear in the viewport.
This shows you the Vertex strands of the hair and roughly how large it will be. The following figure shows you what you should see.
20. Now, let�s setup the parameters for the hair. In the parameters rollout, set the following settings:
Under Density Per Area 1.0 (Increases the number of Hairs)
Under Thickness Maximum 0.1 (Makes hair thinner)
Under Thickness Random Factor 0.52 (Randomizes the thickness)
Under Curliness Enabled On (Turns on curling of the hair)
Under Curliness Turns 4.0 (Number of turns in the curly hair)
Under Random Middle Strands 1.0 (Randomizes the middle strands)
Under Random Vertex Strands 1.0 (Randomizes the vertex strands)
21. Under the Shading, Geometry, Quality rollout, set the following:
Under Shading Shade Bezier Segments On
Under Shading Shade Middle Strands On
22. Scroll back up to the top of the Environment dialog box and select the
Shag:Render atmospheric entry.
23. Set the Quality and Memory spinner to 10.0. This is the highest quality setting.
24. Set the Render Stripe size to 480 and turn on the Render Progress
Bar checkbox. Now, you are ready to render the scene. 25. Close the Environment dialog box. Then, render the Camera view-port at 640 x 480
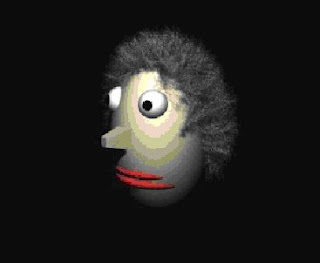
26. Finally, so that the woman�s hair is not a dull gray, go back to the Shag Hair atmospheric and scroll down to the Shading, Geometry, Quality rollout. Here you will find a pair of color swatches labeled Base and Tip. These control the color of the individual hair strands along their length. Change the Base to a dark brown (RGB: 70, 33,0), and change the Tip to a lighter golden brown (RGB: 207,149, 47).
27. Change the Random Factor setting to 0.1. This will give some subtle variations on the Base and Tip colorations throughout the hair and make it look less even. Then render the scene again
Next to come
Shag Hair Tutorial / Part 2
Exploring Materials in Hair
No comments:
Post a Comment